Below, Let’s find out how to Trim Videos in QuickTime Player on Mac without using any third party apps.
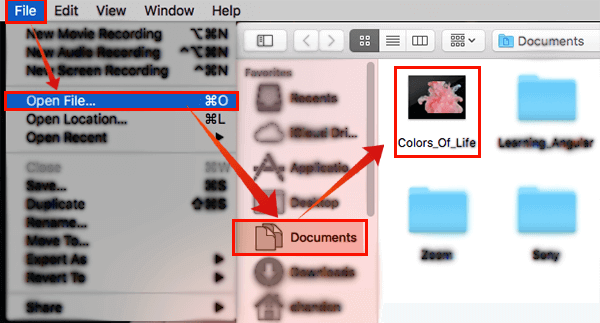
Step1- Choose The Video File
Before we jump to the trim process, Open Video location from Finder on your Mac. Now, if you double click on that then it will start playing by the player. Sometimes the player may not be able to start the video. If the player tells you that it can’t play that video then you must convert the video in a compatible format. Also read: Wondershare UniConverter – All In One Solution for Video Conversion
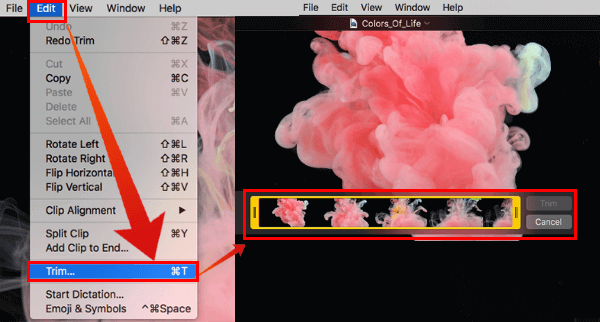
Step 2- Bring the Trim Option
The Trim option can be found inside Edit Option > Trim on QuickTime Player menu. Alternatively, you can press the command+ T key on your MacBook to bring the Trim option in work. You may see a yellow frame when you enable the trim part, this is where you select the parts of the video that you want to edit. Editor’s Recommendation: 16 Best Paid and Free Screen Recording Software for Mac
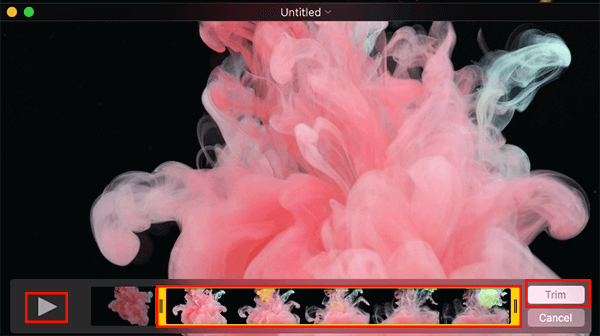
Step 3- Ready with Trimmed Video
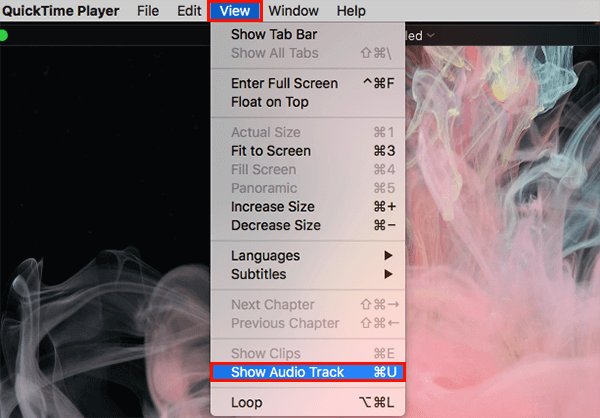
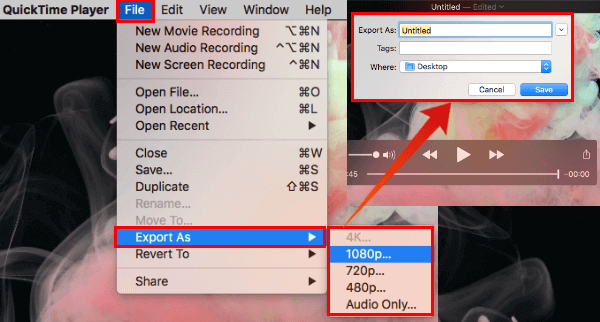
If you correctly performed the above steps then you will see a yellow trimming bar with handles on each side. The inside clips are combined to create a Timeline on which you can work. You can select the part of the video that you want to keep using the handles. For example, if you want to start the video after some second or minute from its original start time, then drag the left side handle. Similarly, you can drag handles inside to stop the video before its original end time. For help, you can use the Play button to play back the selected part. Moreover, you can also see the Audio Track in this mode and do the same selection using handles. To bring the Audio track mode, press command+U button simultaneously. Perform the selection until you are happy with the resulted Video and Audio. Once done, Click on Trim. This will trim the Video with selected parts. To save the trimmed video, you can either click on center Top of the edited video. Here it will ask you to provide a name, place to store and add tags(optional) for the edited video. Also, you can Click on Save from File menu. From Keyboard, press command+S to Save. Alternatively, You can export the trimmed video in different formats such as 4K, 1080P, 720P, 480P, or Audio only. Please note that each format will take a different amount of space in your storage. Editor Recommendation: How to Record iPhone & iPad Screen without any App? Though QuickTime Player can trim videos very easily, it limits to certain functions and good for basic video editing. So you may want to switch to other Mac video editing apps which are completely designed for video editings. These apps are mostly paid and used by professionals who want more effects and elements in their videos. Notify me of follow-up comments by email. Notify me of new posts by email.
Δ