Here, we will talk about WSL (Windows Subsystem for Linux) to get a Linux Bash shell on Windows and run Linux commands without installing a Virtual Machine. Content
What is WSL (Windows Subsystem for Linux)
The WSL or Windows Subsystem for Linux feature enables running Linux command-line tools and utilities on top of Windows. Using WSL, you can install your favorite Linux distro under the hoods of Windows. Also, these distros will include most CLI (Command Line Interface) tools, utilities, and applications. The most interesting part is that everything in Linux will run without any modifications. Let’s see what all things you can do with this Linux Terminal on Windows:
Choose and install your favorite Linux Distro from Microsoft Store. Run the most common Command Line tools such as grep, sed, and other ELF-64 binaries. Bash shell script support. Run different services such as Apache, PostgreSQL, etc. Install extra tools with the Linux default package manager. Invoke Windows apps from a Unix-like shell. Run Linux Workflows inside Windows. Develop Linux Applications using the power of Windows tools Manage IT infrastructure by running a cloud server distro inside Windows.
Setting up WSL on Windows 10
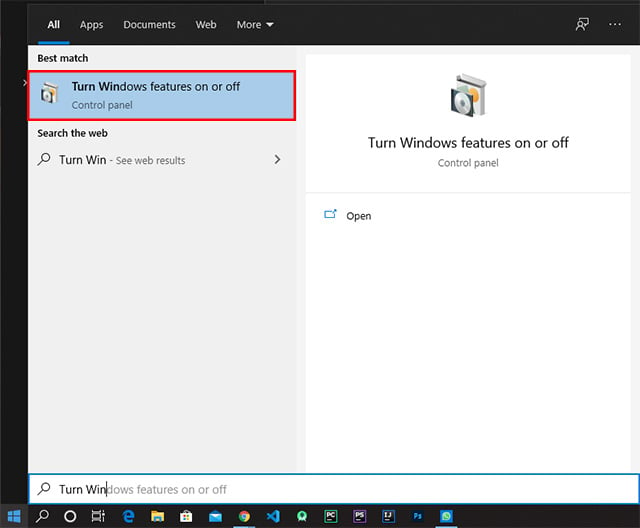
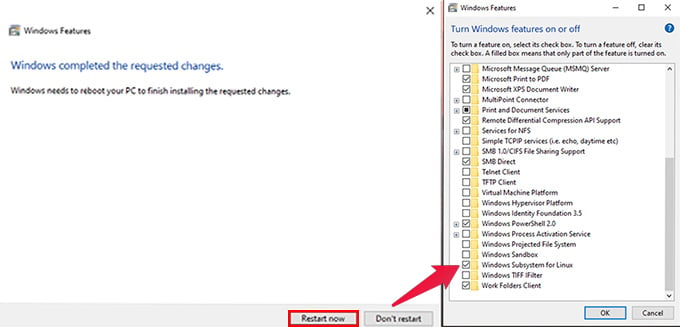
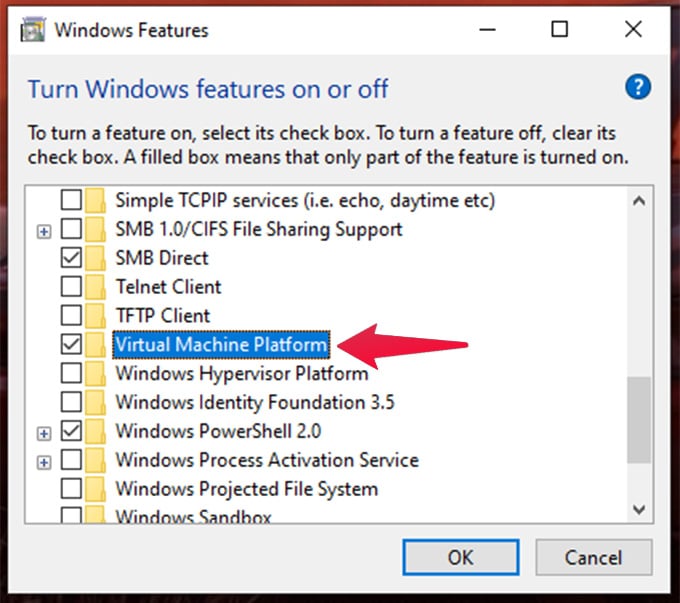
We need to tweak Windows a little bit to set up a WSL or Windows Subsystem for Linux. We have to enable WSL Feature in Windows first:
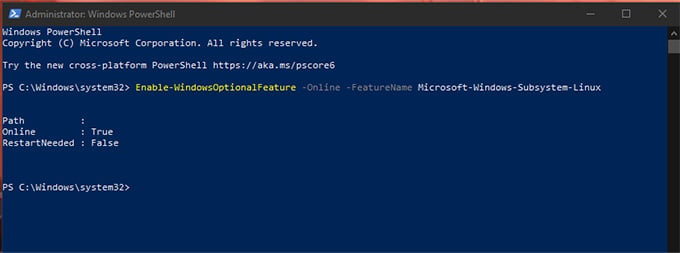
Or you can use Powershell to enable the feature. When prompted, run the following command in PowerShell (Admin) and restart the computer. After completing the new feature update, your PC will be ready to run Linux on Windows. Now let’s see how to install your favorite Linux Distribution in Windows with WSL.
Upgrade to WSL 2
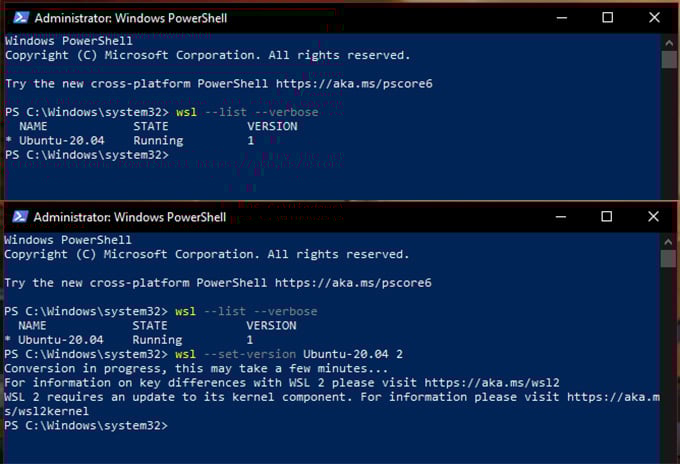
To switch your version of WSL to WSL 2, you have to tweak Windows with some Powershell commands. Let’s see how. We can upgrade the version of a specific WSL Distro or the whole Distro at once. Now, Open Powershell as Administrator by following the method mentioned above. Run the following commands in Powershell Window. As the first step, Download WSL2 Kernel Update from Given Link. https://wslstorestorage.blob.core.windows.net/wslblob/wsl_update_x64.msi Install the setup as same as you do for other apps. Then proceed with the following.
For Specific Linux on Windows
To list out installed Linux distributions. If you don’t have any yet, follow the next section. To set the version to WSL 2: Example:
For Global WSL for Windows
To enable WSL 2 as the global default, we must enable one more additional feature in Windows Features. After restarting, open Powershell as Administrator and run the following command. Then restart your computer to update the feature from WSL 1 to WSL 2. Here it is. Now proceed with installing your favorite Linux Distro in Windows.
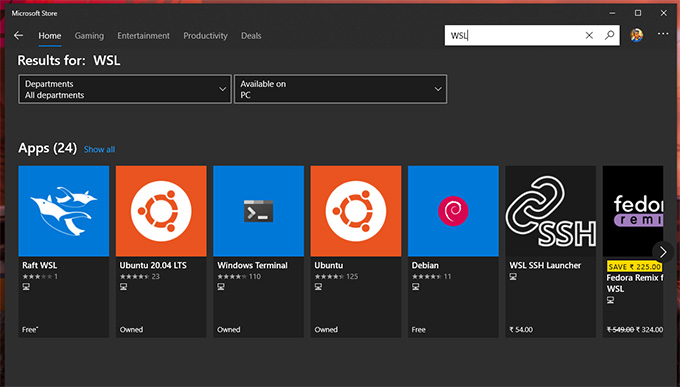
Install Ubuntu on Windows 10 without Virtual Machine
WSL supports various Linux distributions. You can install any of the Linux distros listed below:
Ubuntu LTS(Base) Ubuntu 20.04 LTS Kali Linux Debian OpenSUSE Leap SUSE Linux Enterprise Server
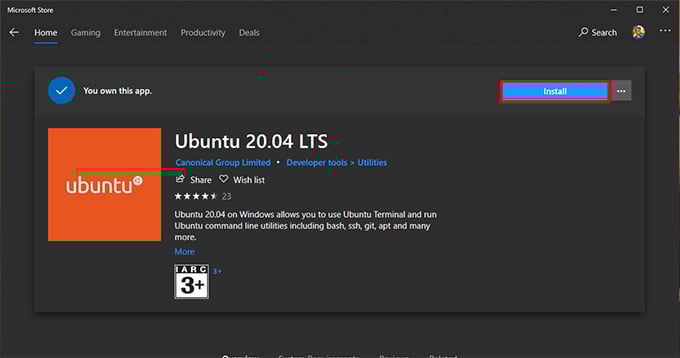
Here, we are going to install Ubuntu 20.04 LTS. You can choose any distro of your choice.
Now that Ubuntu 20.04 LTS is ready for its first launch. You can either click on the launch button in Microsoft Store or launch from the Start Menu. The first setup will take some time to register the Ubuntu environment with WSL. Once that’s finished, the prompt will ask for the Username and Password for your Linux Shell. Enter and complete the setup. After, you can try your favorite Linux commands in this Ubuntu Shell. By default, the home directory of this Windows 10 Linux will be clean and tidy. Hence it gives all the freedom to the user for customizations. Run the following commands in Ubuntu Terminal to check if the system is up to date. The “update” command is used to update the Ubuntu repositories. And the “dist-upgrade” command upgrade packages with all their dependencies. Wait for them to complete. Now you can install any tools and apps your need in this Ubuntu Environment.
Enable GUI for Windows Subsystem for Linux
We can run Linux GUI apps in our Windows Environment itself. To enable GUI on Windows 10, Linux Terminal needs to install some tools in both environments. For the time being, we have to use thirty-party apps to run the GUI in Windows 10 Linux Terminal.
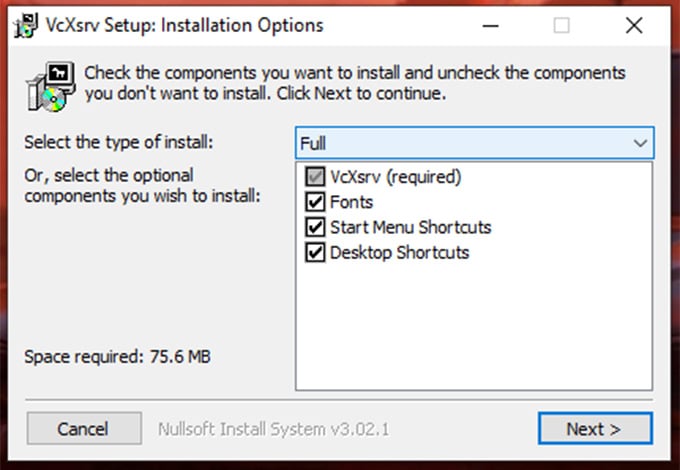
Installing the X Server Utility
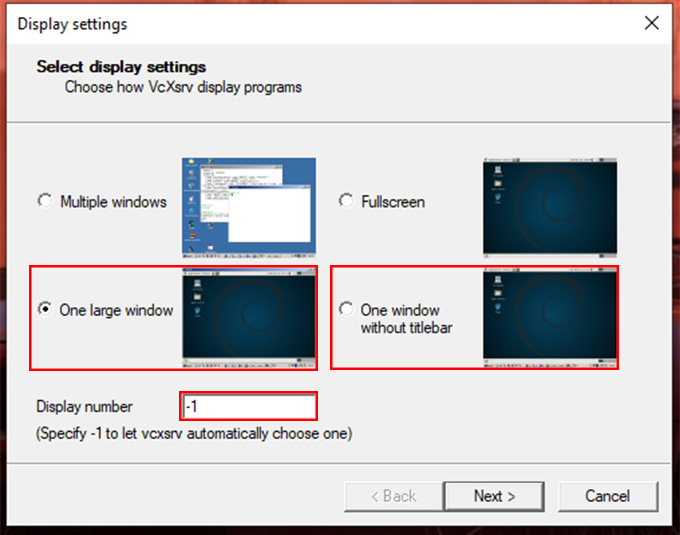
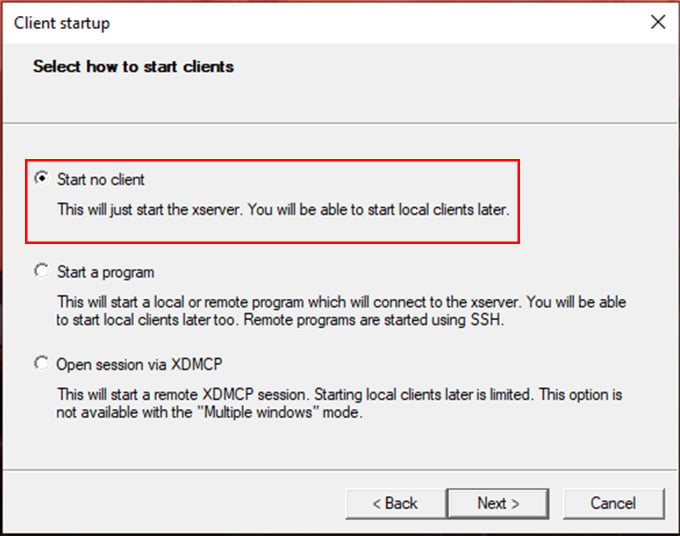
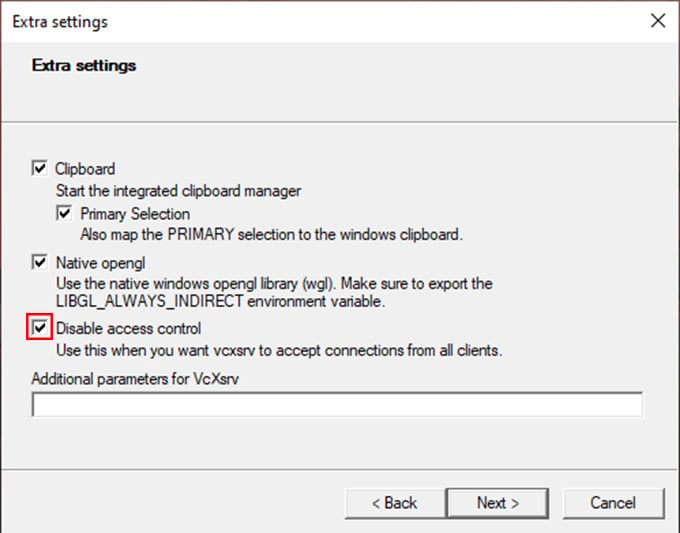
X Server provides almost everything needed to interact with the Linux WSL on Windows. This includes all graphical resources and keyboard/mouse events. The best option available for now is the VcXsrv Windows X Server.
Configure Display Manager in Linux
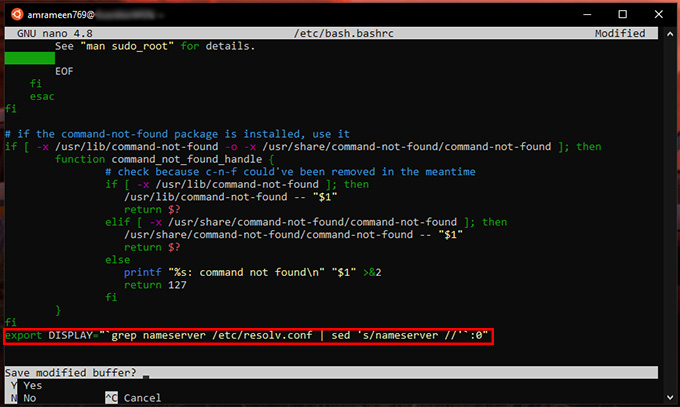
Now we have to enable Linux to communicate with X Server utility, and of course, this happens over the local network. Simply copy and paste the following command in the Linux Terminal for Windows and press Enter. For WSL 1: For WSL 2: This is to set the Display environment of Linux to use the IP address of Windows Host as both WSL and Windows are not in the same network device. Then enter the following to check whether your host IP is changed or not. This step is very important so that the WSL can communicate with X Server on each launch. To run this command on each startup of the Linux Terminal, you can include it in/etc/bash.bashrc file. Follow the steps below: Run the following to open the file with Nano editor in the Linux Terminal with Superuser privileges. Enter your password when prompted. Add the following to the end of the file. Use the Down Arrow key to navigate the cursor. After copying the code, please right-click the mouse button to paste it inside the Terminal Window. For WSL 1: For WSL 2: Then press Ctrl + X to exit. The prompt will ask you to save the buffer. Press the Y key. And then press Enter key. From now, each time you open the Linux Terminal on Windows, the Display Host IP is set to Windows Host IP.
Installing a Linux GUI app
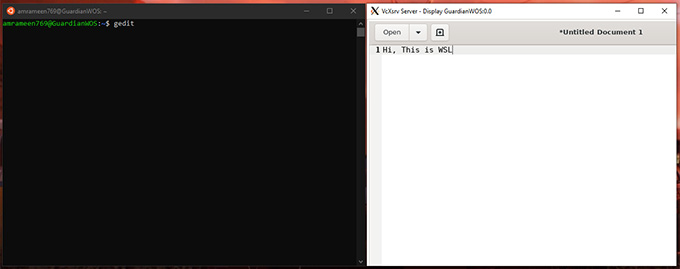
Let’s install and test a Linux GUI app inside the Ubuntu WSL terminal to ensure everything is working. For the Demo, I am using Gedit Text Editor. You can use any one of your choices. To install Gedit, follow the commands below: This will install all xserver utilities needed for the GUI app to run inside the Native Linux Environment along with Gedit. Press Y when the prompt asks for confirmation. After finishing the installation, find the saved XServer configuration. Double Click on the file to start the X Server with a saved configuration. Make sure the X Server’s Blank Window is running in the background. Then switch to the Linux Terminal, and start the Gedit by running the following command: The Gedit GUI will be opened in the X Server Window. You can now do whatever you do with a native Linux GUI App. Always ensure XLaunch is running before launching any GUI Apps on Windows Desktop Environment. That’s all about Enabling GUI on Linux Terminal for Windows. Now, there is another way to interact with WSL distros with RDP(Remote Desktop Protocol) Connection. Let’s have a look at it.
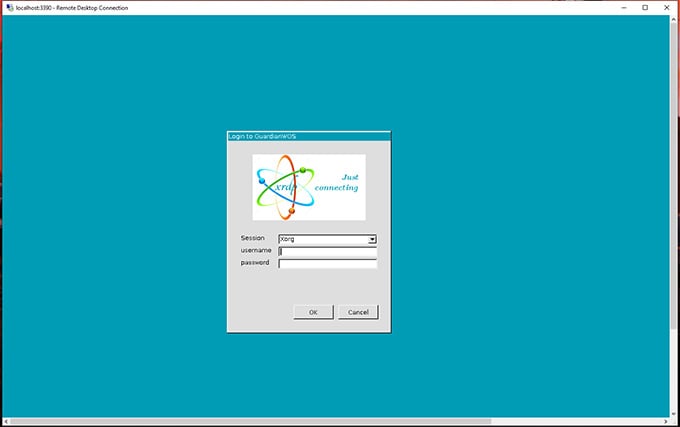
Access Linux Desktop with Remote Desktop Connection
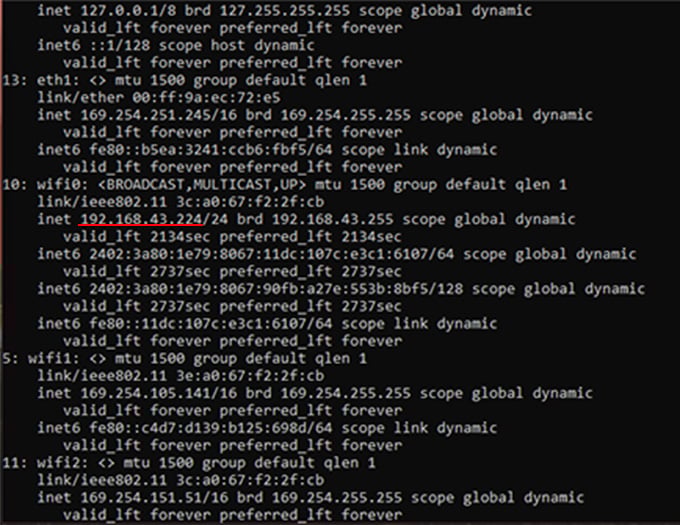
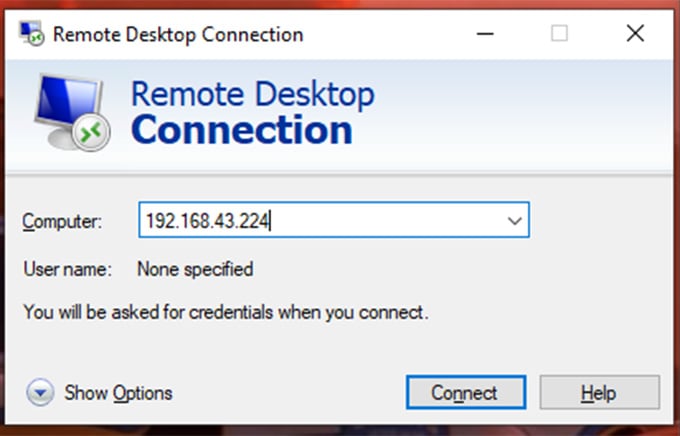
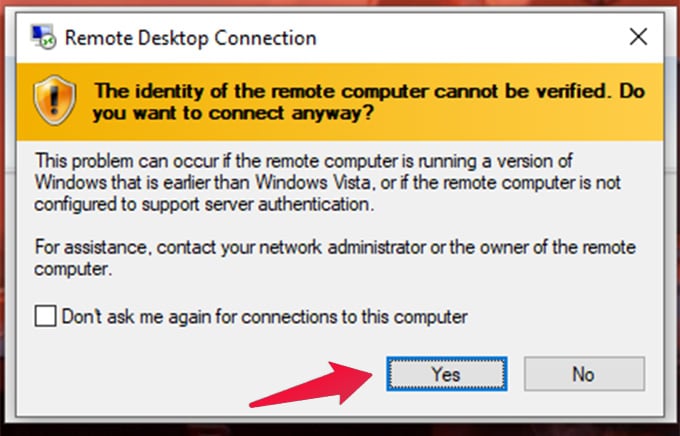
Since Linux supports RDP, we can also connect to Linux Desktop through Remote Desktop Clients. For this, we need to install a Linux Desktop environment in the Linux On Windows first. I am going ahead with xfce4 since it is one lightweight Linux environment. Enter the command: The setup will ask you to choose a display manager for Linux. Choose gdm3 or lightdm. And Press Enter. Also, we need to initialize a graphical login interface for the RDP connection from Microsoft Remote Desktop. For this, install and start a service called xrdp in the Linux Terminal. For Ubuntu: The start command will ask for network access. Click Allow access to accept. To check whether it is running, perform the following command: Then we have to find out the IP address of the Ubuntu Machine. For that, run: Copy the IP address of your adapter, which supports “MULTICAST, BROADCAST.” Use Ctrl + Shift + C to copy from the Linux Terminal for Windows. If this fails with a message shown below, check out the following method. Let’s configure Xrdp a little bit. Run the following commands in sequence. Then, again try to connect to Linux on Windows with Microsoft Remote Desktop Client as described above. There you go. A complete Linux Desktop Environment under Windows Desktop.
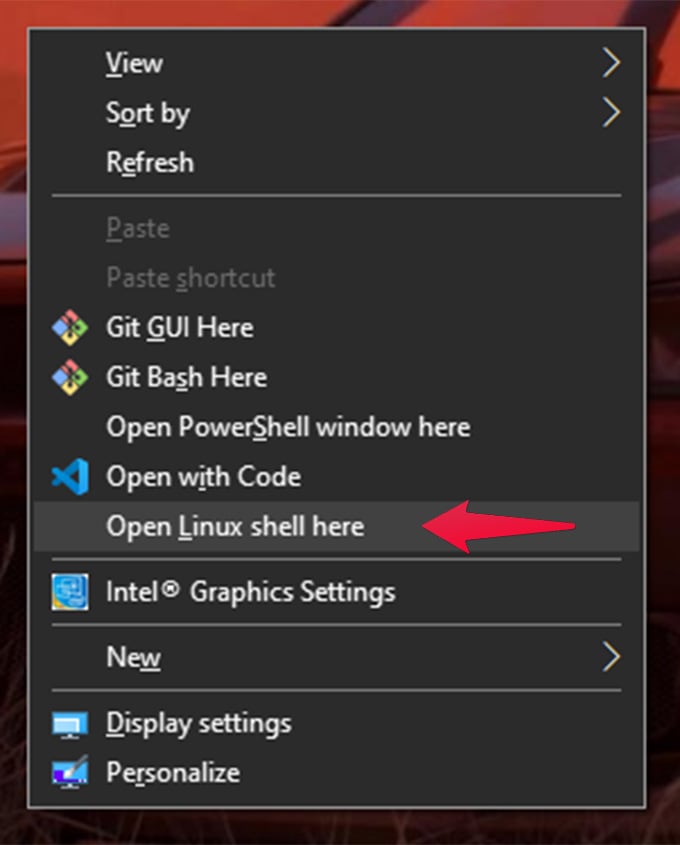
Open Linux Terminal Anywhere
To open up Linux Terminal anywhere on Windows:
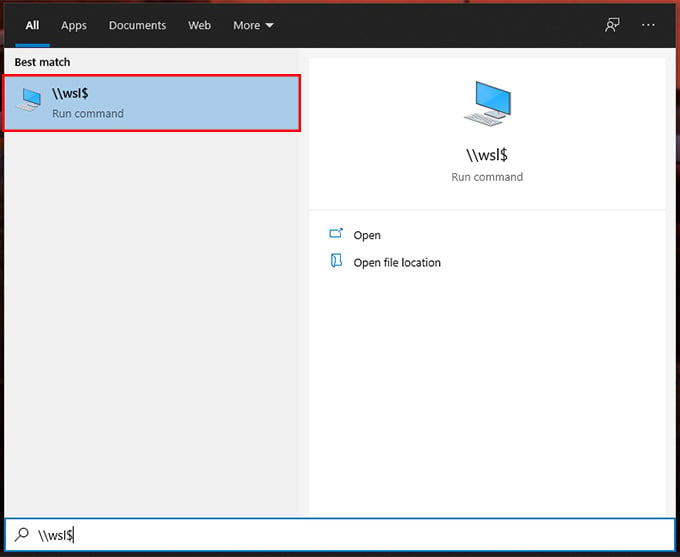
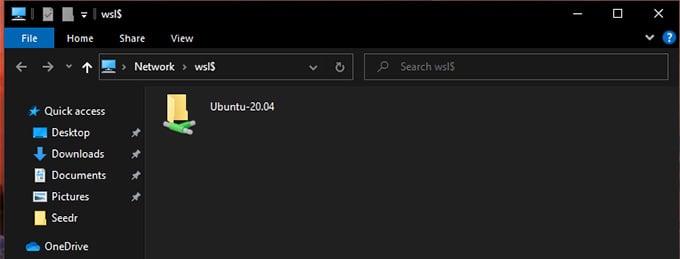
Shared Folders for Windows & Linux
The WSL folders and files are stored in Windows as Shared Network Drives. We are going to access those files through some simple steps. Tweaking the “Shared Folder” with Linux on Windows:
Wrapping Up: Linux on Windows 10
WSL provides many handy features to a normal Windows user to taste the flavors of Linux. This feature can help you do more with your needs. This enables a lot of Linux-only features inside Windows. WSL is the perfect choice for you if you want to run Linux on Windows 10 without making an overload your computer. Here is some of the text also the typo … we have to use thirty party apps to run the GUI. Cheers have a great day! Notify me of follow-up comments by email. Notify me of new posts by email.
Δ